Scratch Basics Beginner Tutorial for Kids
This post may contain affiliate links. As an Amazon Associate, I earn from qualifying purchases.
What is Scratch?
Scratch is a free 看片网站 language developed by the Massachusetts Institute of 《高潮3》未删减版 (MIT) for kids. It is a great introduction to coding and to learn the fundamentals. It has a simple-to-use visual interface that allows kids of all ages to create fun, interactive games, and stories! In this tutorial, we will go over the basics of Scratch and create a few small practice programs.
Step 1: Opening Scratch
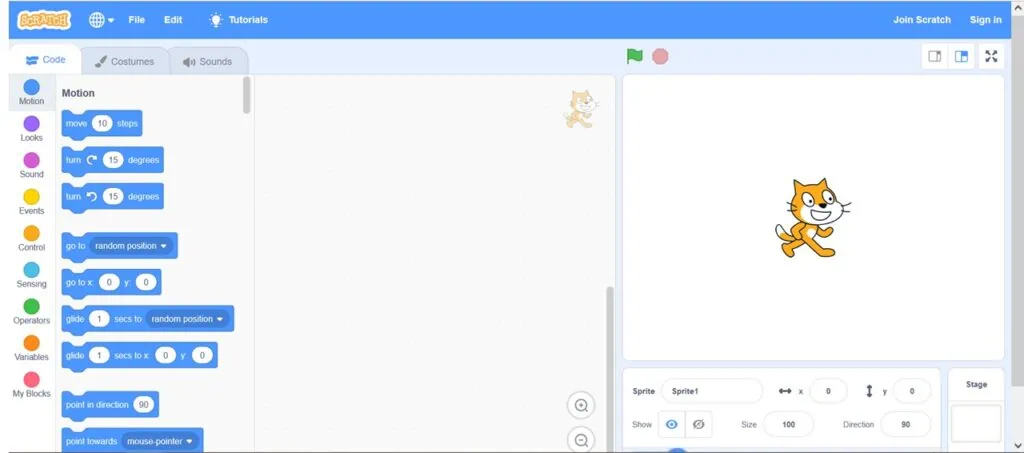
Let’s get started working with Scratch! The first thing we want to do is open up a brand new scratch project. You can do this by going to the Scratch website and clicking on Create at the top, or you can access it directly here. You should see a screen that looks like this:
Step 2: Understanding the interface
At the top of the screen you can see three tabs: Code, Costumes, and Sounds.
For now, we will just focus on the Code tab. On the left side of the screen you can see all of the different types of code blocks:
Each block represents some kind of command we can give, we will combine a bunch of blocks to create a program!
In the middle of the screen we can see the script and stage:
The stage is where we can see our sprite, which is our character. We can give these sprite commands using blocks. The script is where we will build up our code blocks to create the program.
Inside the stage, you can see our cat sprite that we start off with. You can add a new sprite using this button:
You can also change the background of the stage:
At the top of the screen are the start (green flag) and stop (red sign) buttons:
We will use these buttons to start and stop our program.
Step 3: Code blocks
Code blocks are the different types of commands that we can give our sprites. Let’s take a look at all of the different types of code blocks.
Event Blocks
Event blocks allow you to run certain parts of your program when an event occurs. If we click on the events tab on the right side, we can see all of the different types of events:
For now, we will just be using the when green flag clicked block. This will allow the rest of our code to start running as soon as we click the green flag. We can do this by dragging and dropping the code block into the script area:
We can also see that there are event blocks for when certain keys are pressed, when the sprite is clicked, and even when the loudness exceeds a certain limit.
Motion Blocks
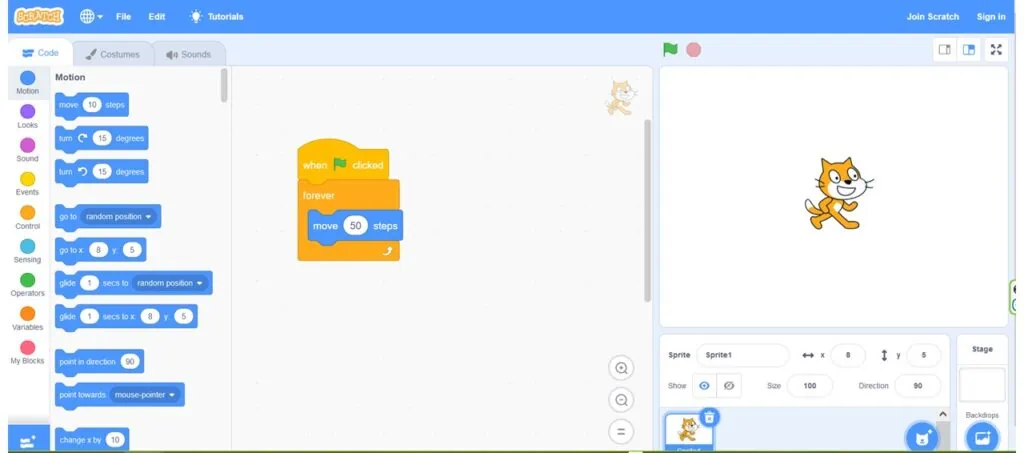
Motion blocks are commands that tell the sprite to move in a certain way. Next, we want our sprite to move 50 steps forward when we click the green flag. We can drag and drop the move __ steps code block underneath our previous event block:
The block defaults to 10 steps, so we will have to change it to 50. Even though we won’t be using them for this tutorial, we can take a look at all of the other types of motion our sprite can perform: we can also rotate our sprite, move it to a random location, or move the sprite to a specific coordinate using motion blocks.
Look Blocks
Look blocks allow us to change the appearance of our sprite. We want our sprite to say hello for 5 seconds after it moves, so let’s drag and drop the say _ for __ seconds:
Click the green flag to see the sprite move and say hi! When you’re finished, make sure to click to red sign to stop your program.
There are also look blocks for changing the costume of the sprite, switching the background, and changing the size and color of the sprite.
Control Blocks
Control blocks allow us to control the flow of a program. The repeat and forever blocks allow us to create loops in our code. The repeat block allows you to repeat code blocks a specified number of times, while the forever block will loop forever. The if-then blocks allow us to change what our code does conditionally, meaning it will depend on another value. The code inside the if-then block will only evaluate if the condition we supply is true.
Let’s modify the code we have a bit to animate our sprite. First, let’s have the sprite continuously take steps using a forever block:
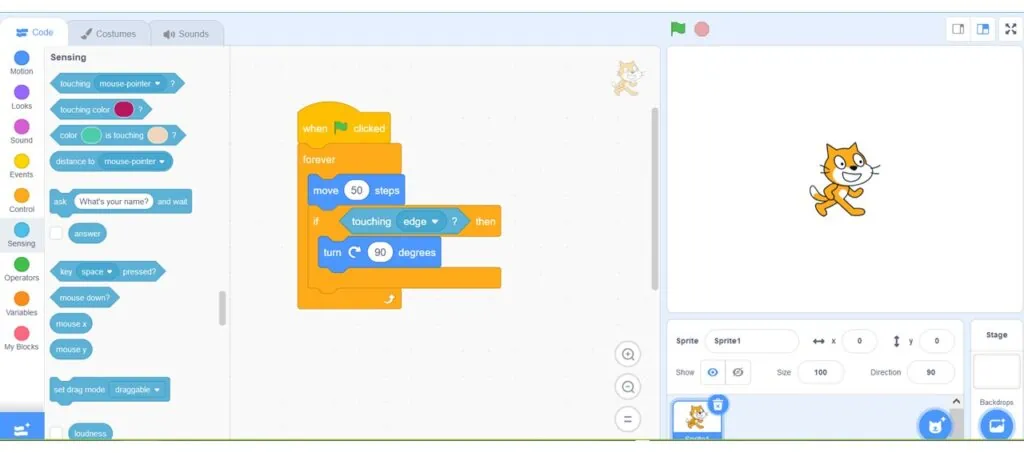
We don’t want our sprite to keep moving off the screen forever, so let’s check to see when the sprite hits the edge so we can turn it around. We can do this by putting an if-then block inside the loop:
Sensing Blocks
Sensing blocks allow us to check how a sprite is interacting with the stage or other sprites. We will be using the touching __ block to check if the sprite is touching the edge of the stage:
There are also options to check if the sprite is touching the mouse pointer or any other sprites you have added. Finally, we can add a 90 degree rotation inside our if-then block:
Now if you hit the green flag, you can see the sprite move back and forth across the screen!
Sound Blocks
Sound blocks allow you to play and modify different types of sound:
You can also create more sounds to use under the sound tab at the top.
Operator Blocks
Operator blocks allow us to perform different types of operations like adding and subtracting:
We can also compare values using less than, greater than, and equal to.
We can also use operator blocks to perform boolean operations. A boolean value is just a true or false value, and we can combine them in several ways using boolean operations:
The and operator evaluates to true if both inputs are true, otherwise it evaluates to false:
True and True = True
True and False = False
False and False = False
The or operator evaluates to true if only one of the inputs are true:
True or True = True
True or False = True
False or False = False
The not operator only takes in one value and evaluates to the opposite of that boolean:
not True = False
not False = True
Here is an example of how we would use a boolean operator. Say we wanted to perform an action only if the sprite is both touching the edge and the space key is pressed. This is what that would look like:
If both of the sensing blocks are true, the and operator evalues to true and we will go inside the if block.
Variable Blocks
Variable blocks allow you to set, change, and view variables in your code:
Variables are letters or symbols that represent a value. For example, if x = 2, then x is the variable name and 2 is the value.
Step 4: Advanced Scratch
If you are interested in learning more, check out our advanced Scratch tutorials here:
Kate is mom of two rambunctious boys and a self-proclaimed super nerd. With a background in neuroscience, she is passionate about sharing her love of all things STEM with her kids. She loves to find creative ways to teach kids computer science and geek out about coding and math. She has authored several books on coding for kids which can be found at Hachette UK.


![Coding Snakes and Ladders [FREE Coding Game!]](https://63kanshu.com/wp-content/uploads/2021/08/Coding-Board-Game-Snakes-and-Ladders-768x512.png)

